Last updated on March 31st, 2023
The Metamask airdrop is one of the most anticipated token airdrops, and you can qualify for it by using some of the features on the portfolio dashboard.
However, you may want to note that the fees that Metamask charges for every swap are extremely high at 0.875%, so you will lose quite a bit of your swap in fees.
The rumour is that the snapshot will be done on 31st March, so it’s best for you to complete these steps ASAP!
Here are the main steps you can do on the dashboard, as well as some other bonus steps you can perform outside of Metamask too.
If you prefer a video guide, you can check it out here:
Contents
Step #1: Using Metamask Swap
Metamask’s swap feature allows you to swap tokens on 6 different networks, including Ethereum, Polygon, BNB Smart Chain, Avalanche, Arbitrum and Optimism.

On top of the high swap fee that Metamask charges, you will need to pay some gas fees for every swap.
Before interacting with any smart contract, you will also need to perform a token approval, and you can learn more about this in my video here.
Most users on Twitter suggest that you will need to make 4 transactions, with a total volume of USD $1,000.
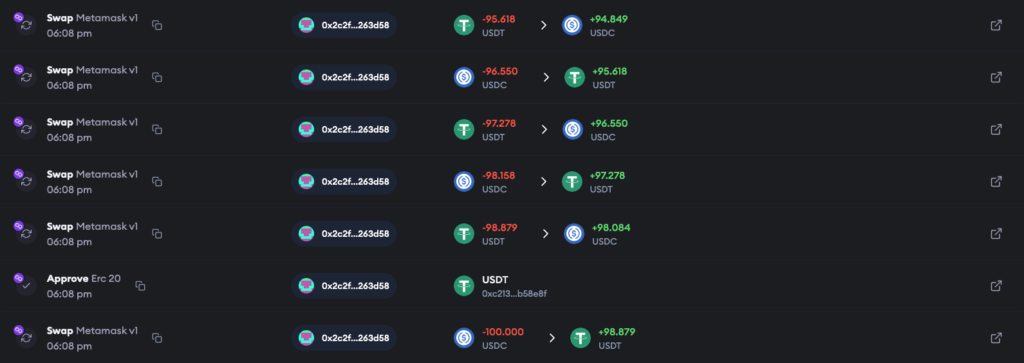
However, I do not have that many funds to play around with and the fees are too high, so I’ve only swapped around 100 USDC 6 times.
In total, I lost about 6 USDC in fees when swapping between USDC and USDT, and around $1 worth of fees that I paid to the Polygon network.
Step #2: Using Metamask Bridge
Metamask gives you the option to bridge your funds between the 6 networks mentioned earlier, like Ethereum, Polygon or Arbitrum.
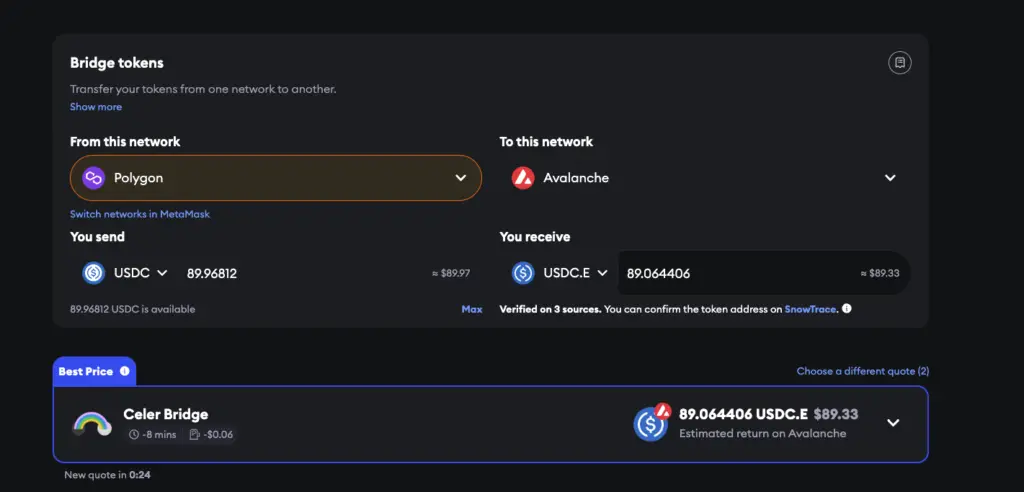
This is done with their partner bridges, including the likes of the Celer Bridge or Hop Protocol.
I bridged my funds from the Polygon network to Avalanche, then to Arbitrum and Optimism, and finally back to Polygon.
The fees are quite high and it would cost you around 1 USDC per bridging transaction.
It may be good to perform 4 different bridging transactions, which could help you to qualify for the airdrop.
Step #3: Using Metamask Stake
Metamask allows you to perform liquid staking on the portfolio dashboard too, but this is currently only limited to Ethereum on Lido or Rocket Pool.

I’ve decided not to perform this step as the gas fees are just way too high to stake Ethereum.
You can find out more about staking Ethereum in my video here:
Step #4: Purchase an ENS Domain
I’ve been holding back from purchasing this domain for a very long time because of the high gas fees on Ethereum, but I’ve finally decided to get one for this airdrop.
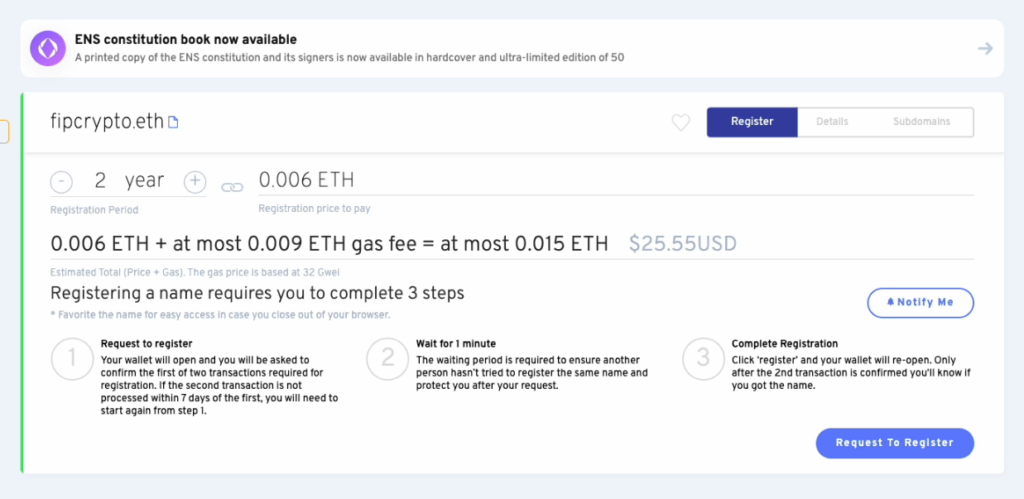
The entire amount that I paid was about $10 USD in ETH for the actual registration (for 2 years), and around $20 USD of ETH for the 3 transactions involved in purchasing one domain.
This is just a rumoured step that could help you gain a large allocation of the airdrop, so it’s optional because of the high costs involved.
Step #5: Create a multi-sig wallet on Safe
The last possible step is to create a multi-sig wallet on Safe.

The good news is that Safe allows you to create this wallet across different networks, and I’ll be creating mine on Polygon due to the lower gas fees.
All of the
Conclusion
It may not be that worth it to try and qualify for this airdrop, especially since each step can cost quite a large amount of fees.
However, you may never know and hopefully, we could still get some allocation of the tokens!
Do you find it overwhelming to track all of the different airdrops that are available?
I’ve created an airdrop tracker of all the different networks and projects that I’m keeping an eye on,

and you can gain access to it by signing up for my Substack newsletter! The link to this Notion site will be included in the welcome email.
Are you passionate about personal finance and want to earn some flexible income?


